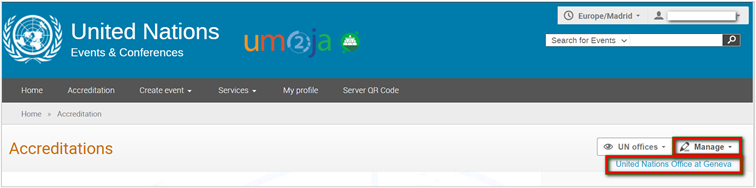
Accéder à la zone de gestion
Aller sur https://indico.un.org/accreditation/
À droite de l’écran, cliquez sur Manage et sélectionnez United Nations Office at Geneva.
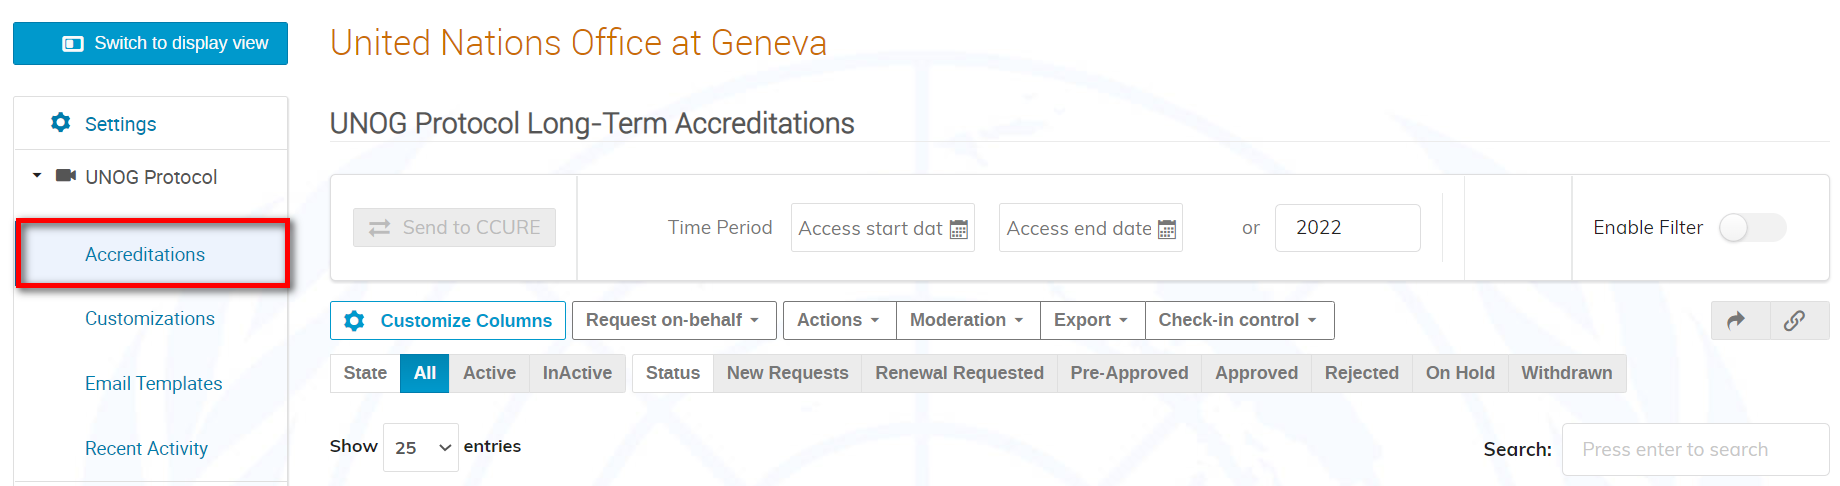
Dans le menu situé à gauche de l’écran, déroulez le menu de votre bureau et sélectionnez Accreditations. Ceci affiche la liste des demandes.
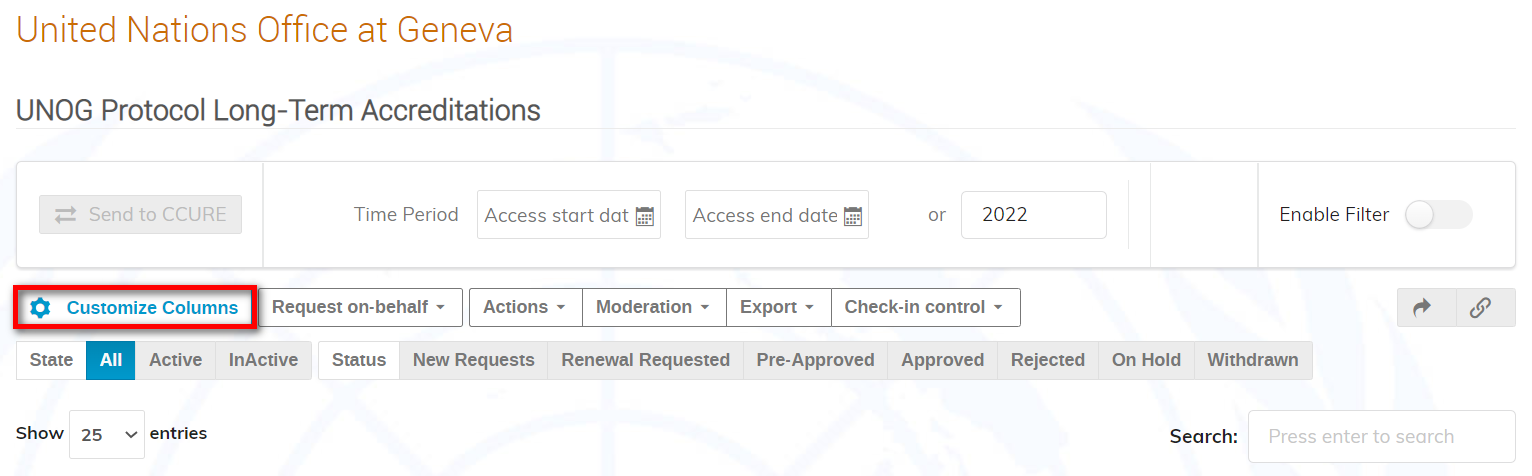
Personnaliser les colonnes
Pour personnaliser l’affichage de la liste, cliquez sur Customize Columns.
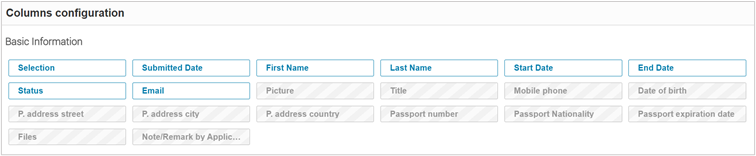
Cliquez sur l’une des options pour afficher/masquer les colonnes correspondantes dans la liste des demandes. Les colonnes affichées dans la liste sont surlignées en bleu, celles qui sont masquées sont grisées. Cliquez sur Done pour sauvegarder.
Demande au nom de
Si les managers doivent soumettre une demande au nom d’une autre personne, cliquez sur Request on behalf.
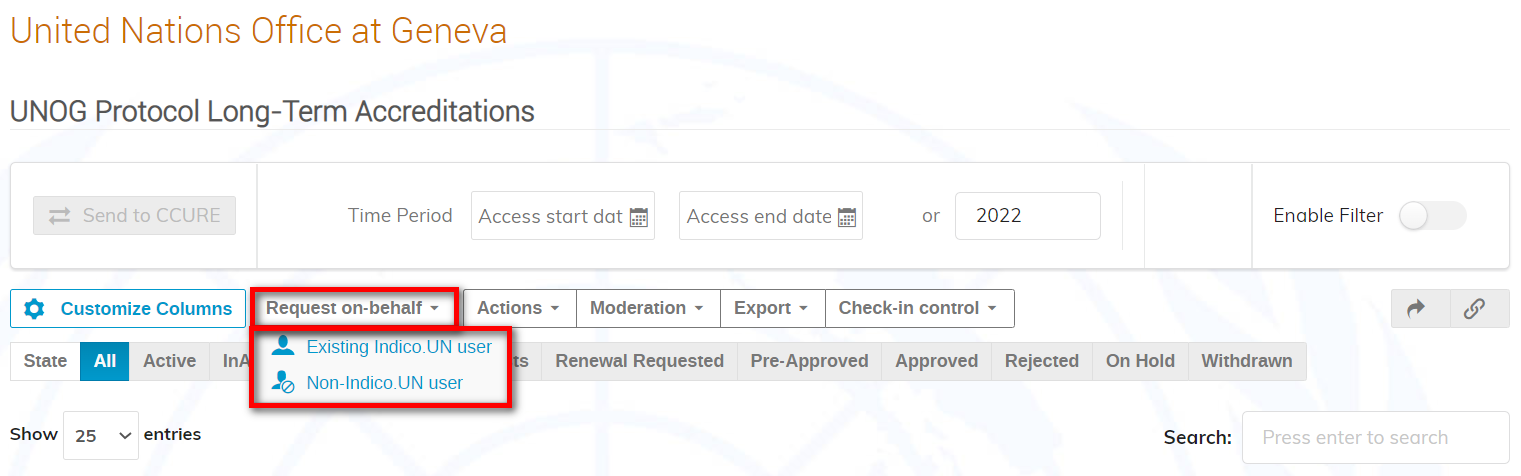
Sélectionnez d’abord Existing Indico UN user first et entrez le nom et/ou l’e-mail pour rechercher l’utilisateur[1]. Une fois l’utilisateur trouvé, cliquez sur Choisir et continuez à remplir le formulaire de demande, à certifier et à sauvegarder.
Si la recherche d’un utilisateur existant ne donne aucun résultat, cliquez sur Request on behalf et sélectionnez cette fois-ci Non-Indico UN user. Complétez le formulaire de demande, confirmez et sauvegardez..
Actions
Pour envoyer un e-mail, consulter la section de gestion, ajouter à une liste de surveillance ou supprimer une ou plusieurs demandes de la liste, sélectionnez la/les demande(s) et ouvrez le menu Actions.

| Email:
| De : Par défaut, le courrier électronique est envoyé par une adresse électronique noreply@un.org. Répondre à*[2]: Par défaut, l’email de notification défini dans la page de personnalisation est sélectionné. Vous pouvez également développer le menu déroulant et sélectionner un autre expéditeur. L’adresse e-mail de l’utilisateur connecté et les autres adresses ajoutées lors de la personnalisation de la section de notification sont incluses dans la liste. CC: Saisissez les adresses électroniques des personnes qui doivent recevoir une copie (le cas échéant). Indiquez une adresse électronique par ligne.Objet*: Si l’e-mail est ad hoc (c’est-à-dire qu’aucun modèle enregistré n’est utilisé), une ligne d’objet doit être saisie. Modèles stockés: Sélectionnez un modèle dans un menu déroulant. La ligne d’objet et le corps de l’e-mail sont automatiquement remplis (voir la section Modèles d’e-mail).Corps de l’e-mail*: Si un modèle enregistré existant n’est pas sélectionné, saisissez un texte pour l’e-mail et, si vous le souhaitez, ajoutez des espaces réservés (champs) pour personnaliser l’e-mail. Destinataires: Auto-explicatifEnvoyez-moi une copie: Auto-explicatif Prévisualisation de l’e-mail: Auto-explicatif |
| Section de gestion : | Vous pouvez y modifier les dates des badges, ajouter des étiquettes (post-it) ou des commentaires. Lorsque vous avez terminé, cliquez sur Modify. N’oubliez pas que si vous sélectionnez plus d’une demande dans la liste, toute action entreprise dans la section Gestion sera appliquée à toutes les demandes sélectionnées ! |
| Ajouter à la liste de surveillance : | Ajouter le(s) demandeur(s) sélectionné(s) à une liste de surveillance. Une icône s’affiche à côté de son nom sur la liste complète des demandes. |
| Retirer : | Retirer définitivement la ou les demandes sélectionnées de la liste. |
Moderation
Pour pré-approuver, approuver, rejeter ou mettre en attente une ou plusieurs demandes, faites une sélection et ouvrez le menu Moderation .
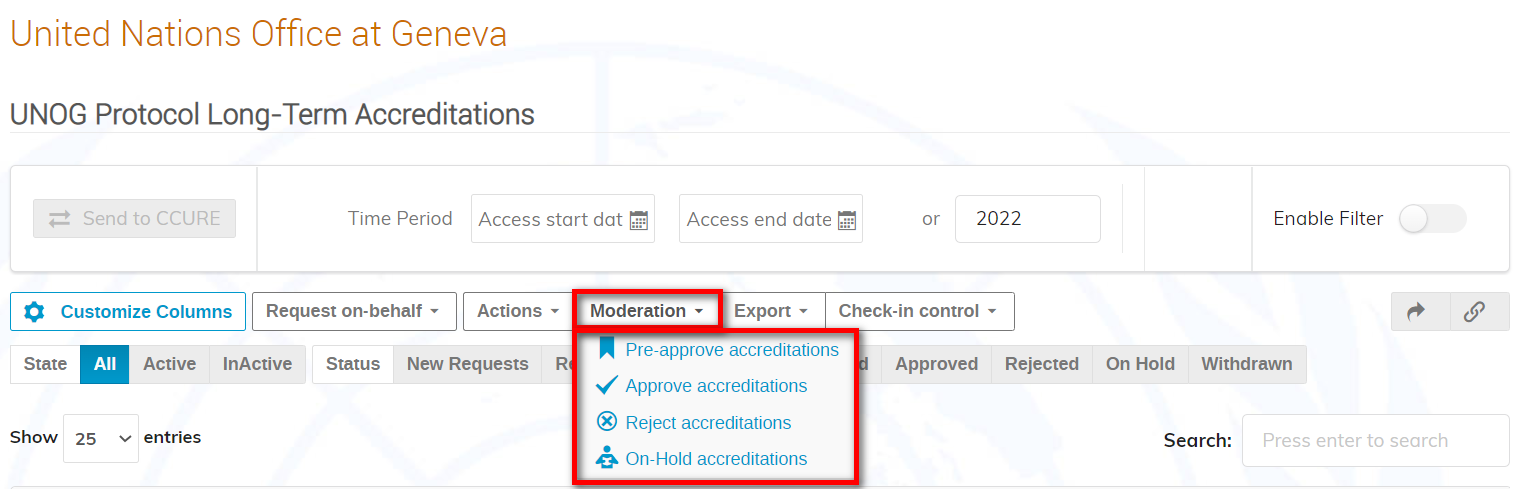
Appliquez l’un des statuts suivants :
Pré-approuver :
Bien qu’approuvé en théorie, une autorisation supplémentaire est nécessaire avant que l’approbation définitive ne soit accordée. Aucune notification automatique n’est envoyée. Veuillez vous référer à la section Pré-approuver une demande.
Approuver:
L’approbation est accordée de manière définitive. Des notifications automatiques sont envoyées. Veuillez vous référer à la section Approuver une demande.
Rejeter :
La/les demande(s) est/sont refusée(s). Des notifications automatiques sont envoyées. Veuillez vous reporter à la section Rejeter une demande.
En attente :
La/les demande(s) est/sont remise(s) en question ; dans ce statut, la demande ne peut pas être modifiée par le demandeur/point focal. Aucune notification automatique n’est envoyée. Veuillez vous référer à la section Mettre une demande en attente.
Si un changement de statut d’une demande déjà approuvée ou rejetée est nécessaire, il faut d’abord la mettre en attente, puis appliquer le nouveau statut.
Exporter
Pour exporter au format xls les données d’une ou plusieurs demandes, faites une sélection et ouvrez le menu Export.
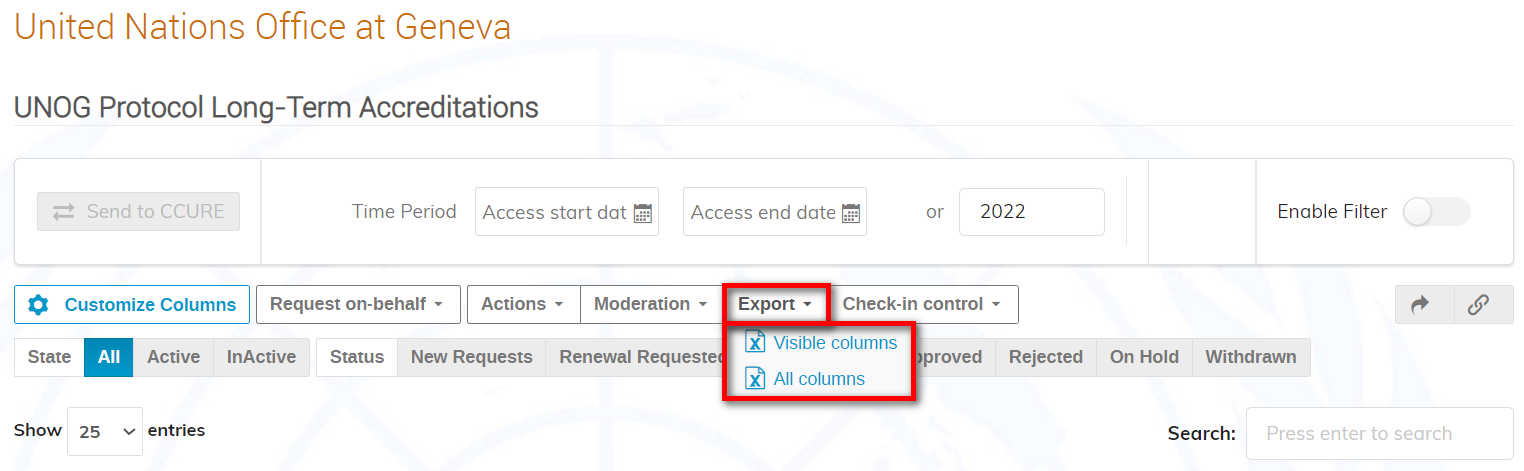
- Visible columns: cette option exporte les données visibles à l’écran dans les colonnes affichées.
- All columns: cela exporte les données visibles à l’écran dans les colonnes affichées ET dans les colonnes cachées (voir la section Personnaliser les colonnes).
Filtres sur l’interface de la liste des demandes
Il existe 4 façons de filtrer ou de rechercher des demandes dans l’interface de la liste des demandes.
1.Enable Filter: après avoir activé le filtre, saisissez une valeur appropriée, par exemple le nom, le statut, l’e-mail, etc., dans un champ vide situé au-dessus d’une des colonnes de la liste et appuyez sur la touche Entrée/Retour pour obtenir des résultats.
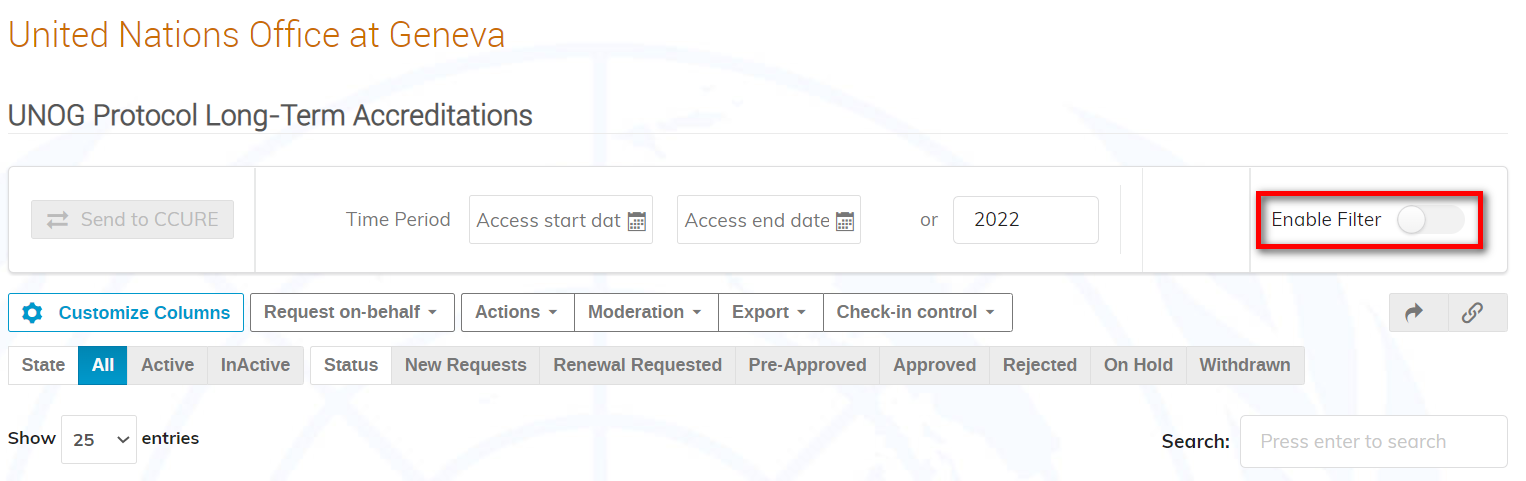
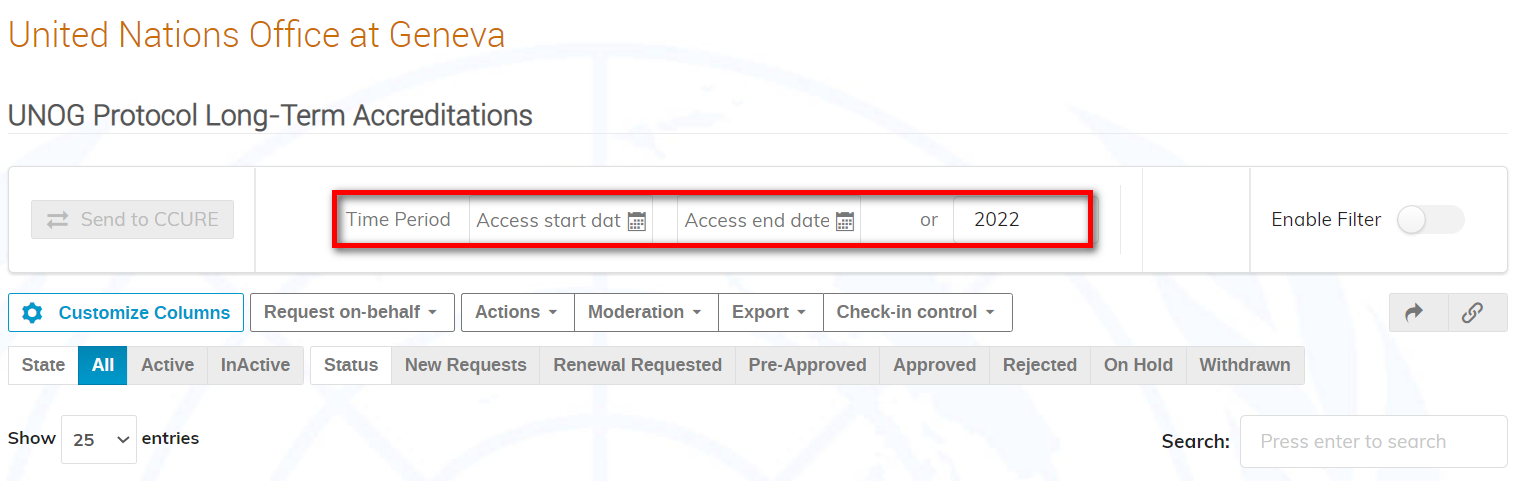
2.Time period: use les Time Period calendars pour saisir une plage de temps ou une année spécifique pour obtenir des résultats.
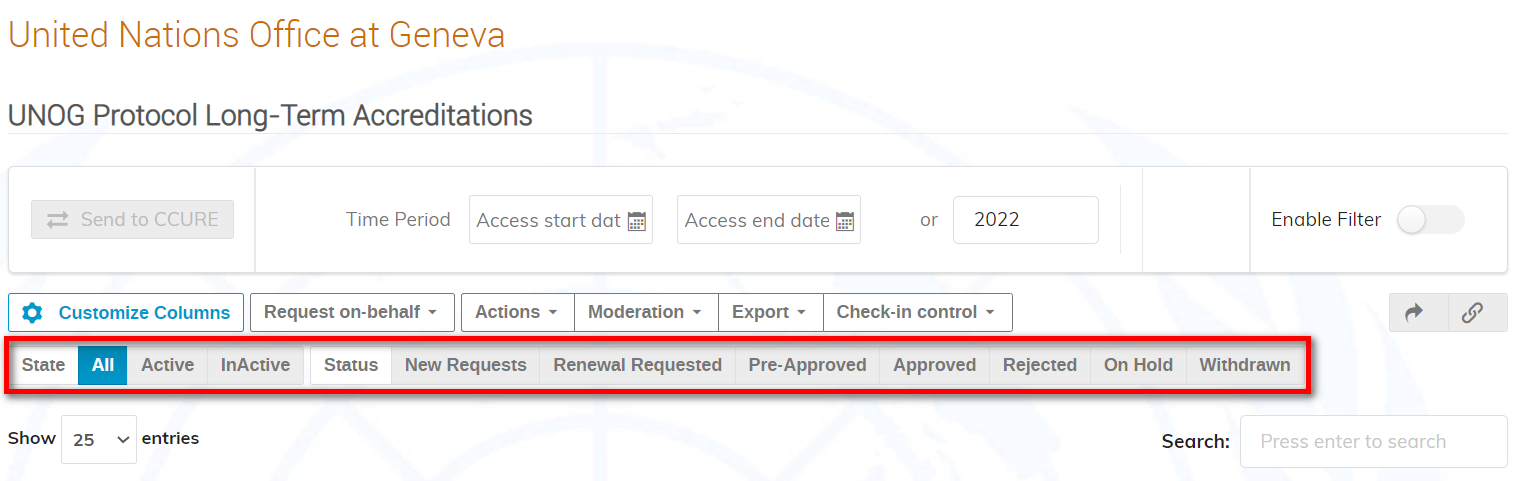
3.State/Status:
For State, Active means requests approved and for which the approval period has not yet expired. Anything else is considered Inactive. So you may filter out based on State.
For Status, you may filter out requests such as by those approved, rejected, withdrawn etc.
A blue background indicates the filter applied.
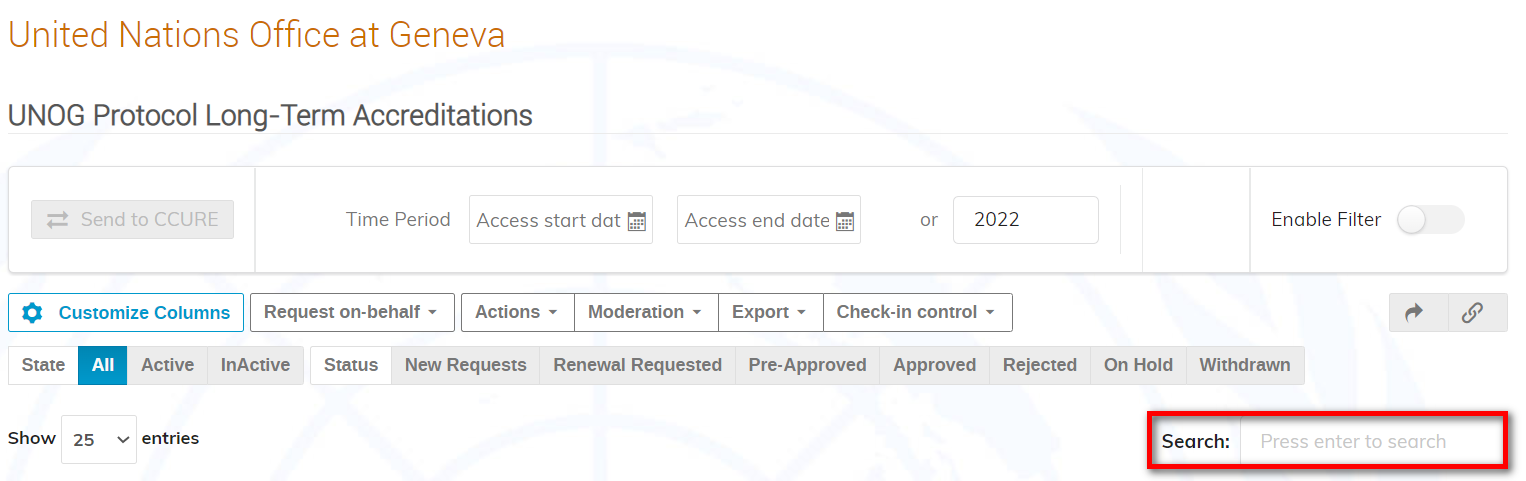
4.Search: enter e.g., a name or e-mail address in the Search field and hit return/enter to yield results.
Filters on a request summary interface
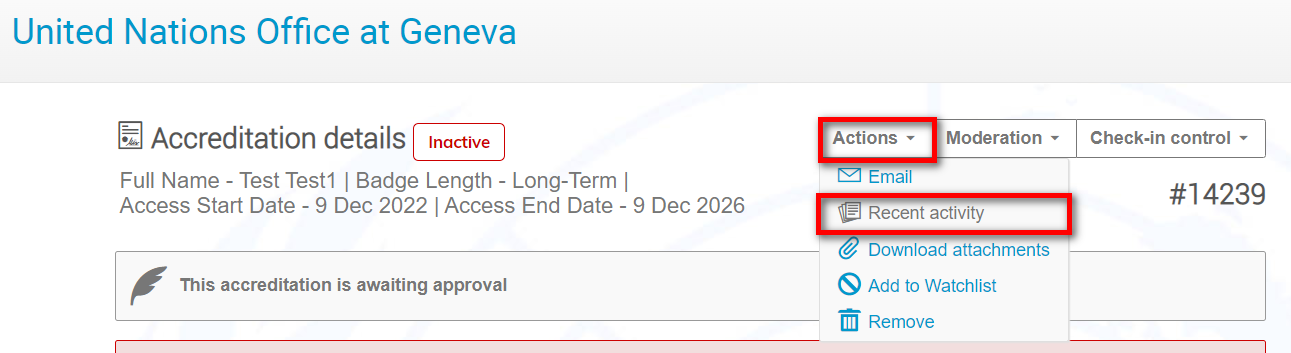
Open a request.
Under Actions: Recent Activity filters may be applied to search for e.g., what activities have been performed within a specific time frame or year for that requestor, or actions taken by a particular manager (i.e., perform a search using the manager’s e-mail), or what e-mails have been sent to the focal point/requestor, etc.
Temporary URL
Once filter or search results are yielded on the list, it is possible to generate a temporary URL which is copied to the clipboard for sharing with e.g., another manager. Use the chain-link button (located beside the reset filters button). When that manager accesses the URL, he/she has the same filtered/search view initially generated.

Access a request summary page
Click a name on the list.

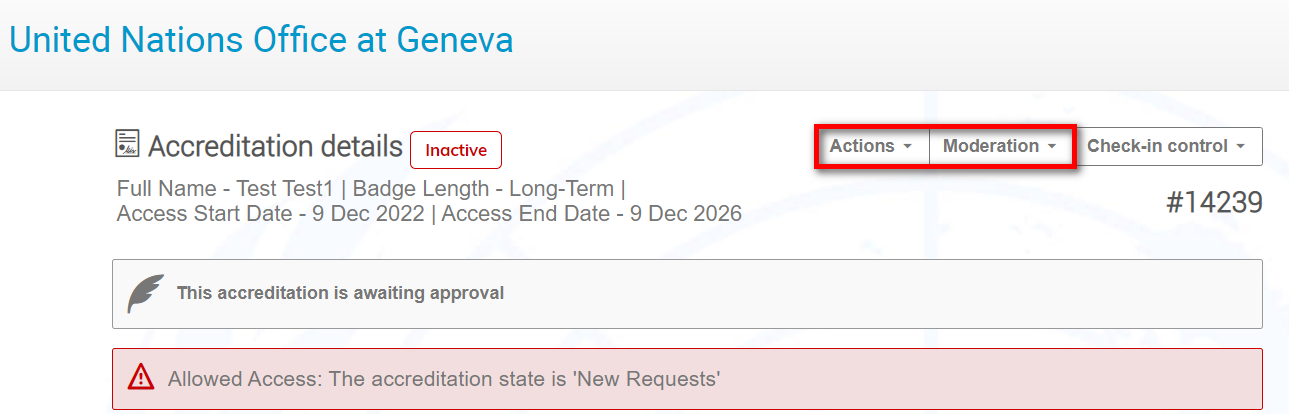
Request summary page
On a request summary page there are 2 menus: Actions and Moderation. These each offer a selection of options to choose from when processing a request.
Actions menu
| E-mail: | From: By default, email gets sent by a noreply@un.org email address.
Reply to*[3]: By default, the notification email defined in the Customization page is selected. Alternatively expand the drop-down menu and select a different sender. The logged-in user’s e-mail address and other addresses added whilst customizing the notification section are included on the list. CC: Enter e-mail addresses of those to receive a copy (one e-mail address per line).Subject*: If the e-mail is ad hoc (i.e., no stored template is being used) a subject line must be entered. Stored Templates: Select a template from a drop-down menu. The subject line and the e-mail body are automatically populated (refer to the page Email Templates).E-mail body*: If a stored template is not selected, enter a text for the e-mail and, if desired, add placeholders to personalize the e-mail. Recipients: Self-explanatorySend copy to me: Self-explanatory Preview e–mail: Self-explanatory |
| Recent activity: | All activities performed in relation to the request being viewed are displayed in a table. It indicates when an activity took place, what the activity was, the type of activity and who performed the activity. |
| Download attachments: | Download documents attached to the request being viewed to a zip file. |
| Add to watchlist: | Add the requestor whose summary page is being viewed to a watchlist. An icon is displayed beside his/her name on the full list of requests. |
| Remove: | The request is deleted definitively. |
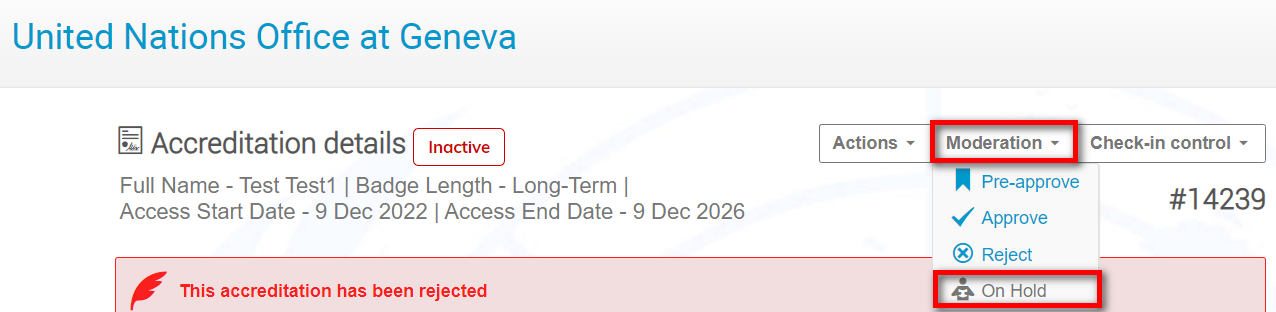
Moderation menu
Apply one of the following statuses to the request being viewed:
Pre-approve:
Whilst approved in theory, the request requires further clearance before definitive approval is granted. No automatic notifications are sent (refer to the section below Pre-approve a request).
Approve:
The request is approved definitively. Automatic notifications are sent (refer to the section below Approve a request).
Reject:
The request is declined. Automatic notifications are sent (refer to the section below Reject a request).
On Hold:
The request is questioned; in this status, the request cannot be modified by the requestor/focal point. No automatic notifications are sent (refer to the section below Place a request on hold).
Should a change be needed to the status of an already approved or rejected request, it must be placed on hold first before applying the new status.
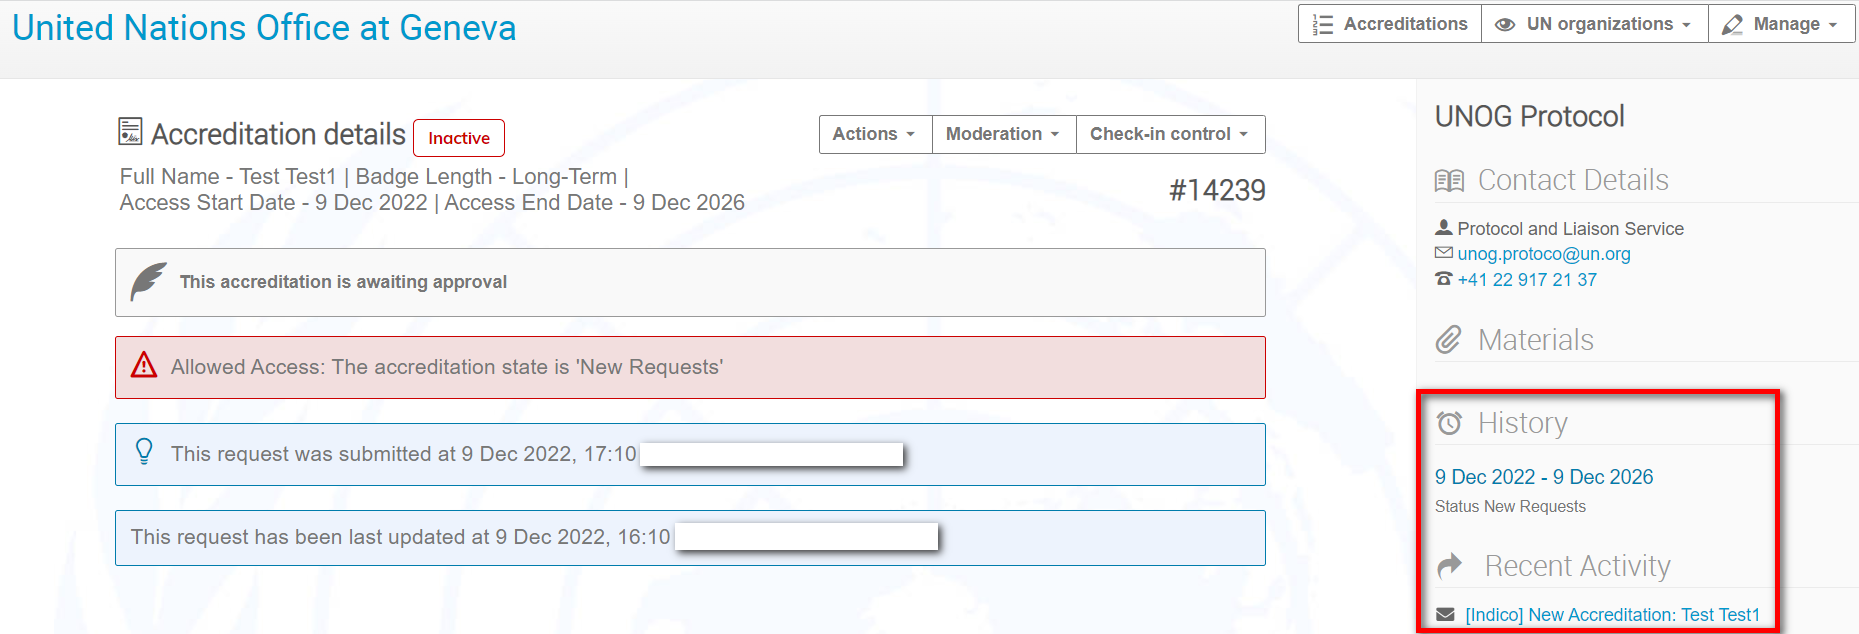
Requestor History and Recent Activity
It is possible to view a log of a requestor’s history and recent activity via a request summary page. See History and/or Recent Activity on the right of the page. Listed are all the requestor’s previous requests along with their status. Click into any of the listings to view.
Modify a request
Managers and Security officers are allowed to modify a request at any time regardless of its status.
Whilst viewing a request summary page, should changes need to be made, click the pencil icon in the relevant section. You will have the option to notify the user of any changes made. When the fields become active make the changes.

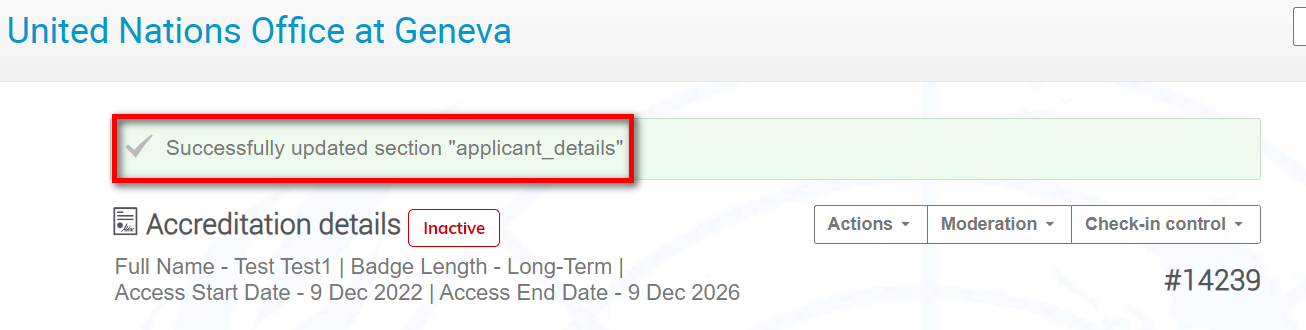
After making changes click Save.
A confirmation message appears on-screen.
Missing or incorrect information on a request
NOTE: Only managers and security officers may modify ON HOLD requests!
If any information is missing or if any document requires updating, managers should not change a request’s status and instead reach out to whomever submitted the request via e-mail. The e-mail should lay out exactly what is required and make clear instruction on what is to be done.
Managers and security officers are strongly advised to carefully review details and attachments on a request before approving/pre-approving. If the request is approved following which it is realized that information is missing or incorrect, then it is a Manager who will have to obtain this information and modify the request him/herself.
To keep note of why the request has not been acted upon, a tag may be placed against the request giving explanation.
Étiquettes
Tags are small notes or reminders added to a request that may be viewed in a column beside it on the list.
First, display the Tags column on the list (refer to the section above Customization Columns).
Select a request on the list.[4] Under the Actions menu select Management section.
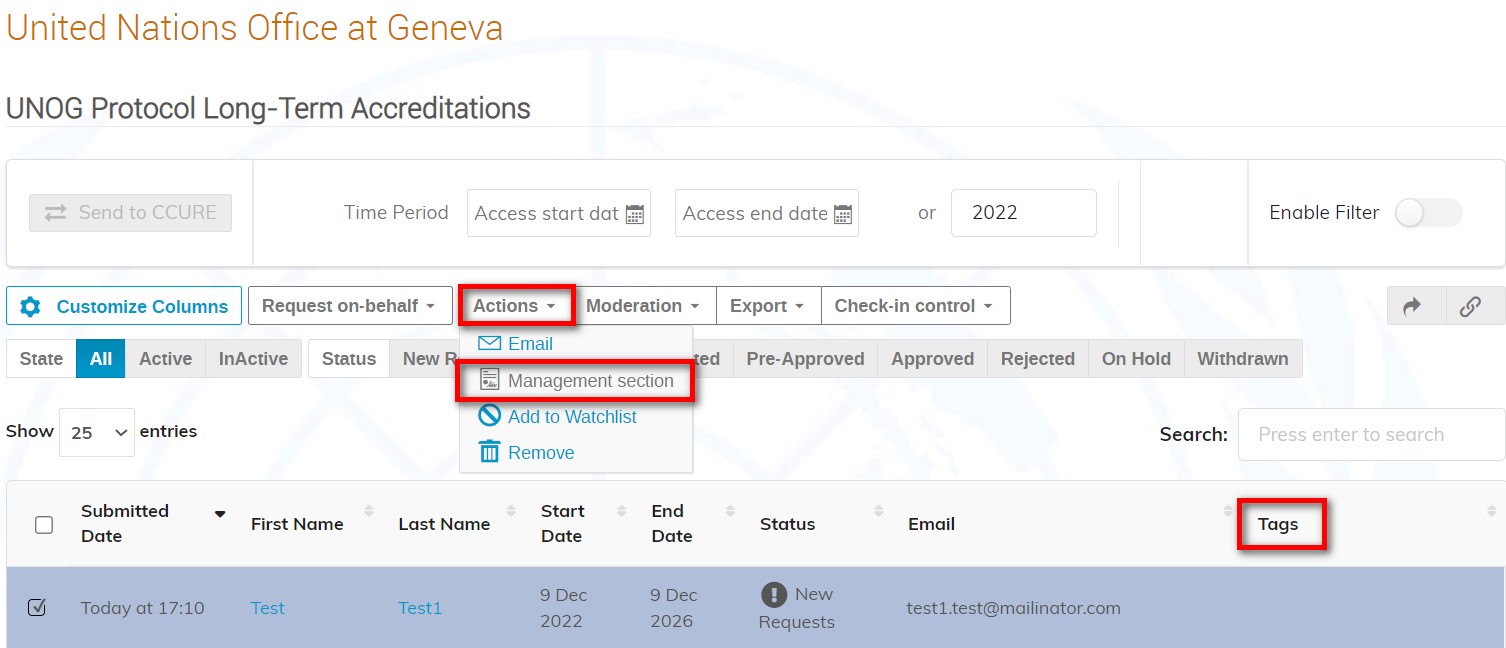
In the Management section window, enter the text of the tag. Hit the return/enter key. Click Modify.
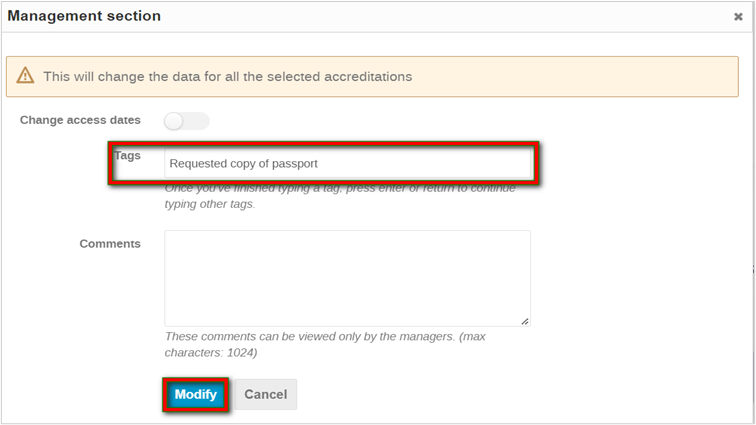
The tag appears on the list beside the request.

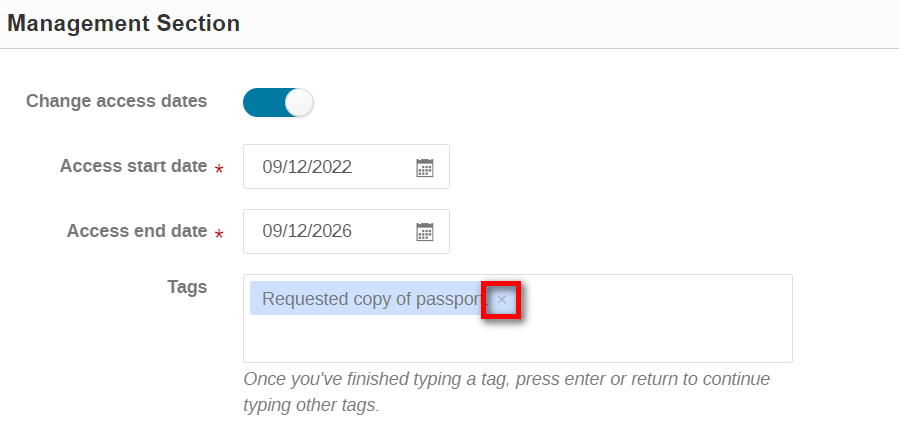
To remove a tag, open the appropriate request summary page and scroll down to the Management Section. Click the pencil icon to activate the section. Click the small x beside the tag to remove. Click Save.
Moderation
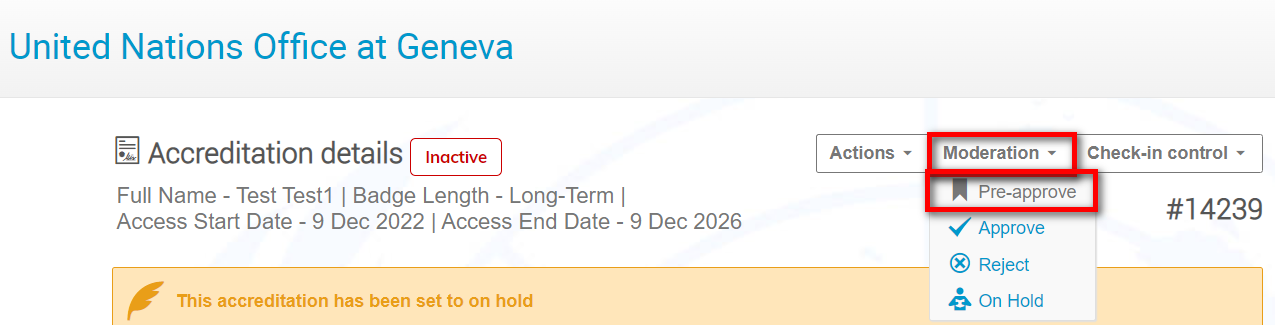
Pre-approve a request
Pre-approve is usually used when there are 2-levels of approval. For example, a first manager reviews a request and pre-approves it. Then a second manager reviews the pre-approved request and ultimately approves it.
In the request summary page click Moderation and select Pre-approve.
A message appears on-screen confirming the pre-approval.
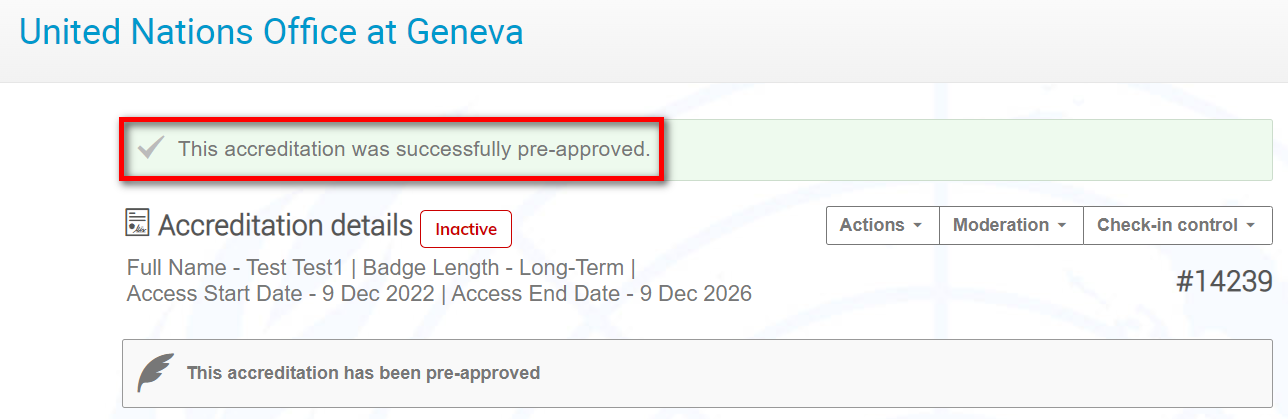
There is no e-mail notification sent when a request is pre-approved.
Upon pre-approval a request may subsequently be:
- approved (by manager/security officer)
- rejected (by manager/security officer)
- placed on hold (by manager/security officer)
- withdrawn (by submitter/focal point)
NOTE: Pre-approved requests may not be sent to C*Cure for printing.
Approve a request
Review the badge request form and ensure that all appropriate documents are attached and that the badge validity dates (refer to the section below Change Badge Validity Dates) are in line with the official request.
In the request summary page click Moderation and select Approve. A message appears on-screen confirming the approval[5].
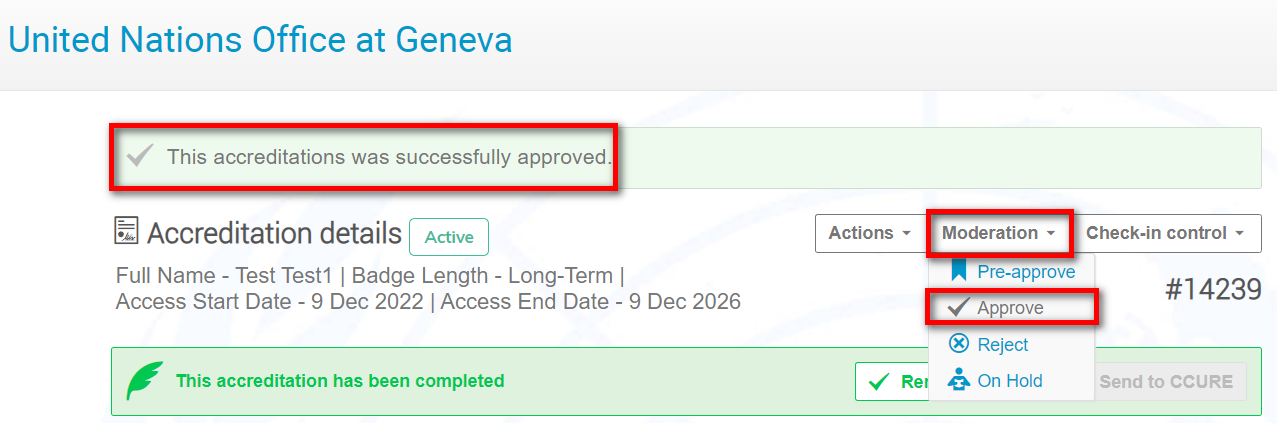
Once approved, an e-mail notification is generated and sent to the requestor and the focal point (if request was submitted by one). If a focal point group has been set up, a notification may enabled to be sent there too.
Upon approval, a request may subsequently be:
- rejected (by manager/security officer but has to be placed on hold first before rejection),
- placed on hold (by manager/security officer)
- renewed (by focal point)
- withdrawn (by requestor/focal point)
NOTE: Approved requests may be sent to C*Cure for printing.
Change badge validity dates
To change badge validity dates, open the appropriate request summary page and scroll down to the Management Section. Click the pencil icon to activate the section.

Enter the required validity dates. These will display on the badge once it is issued. Click Save.
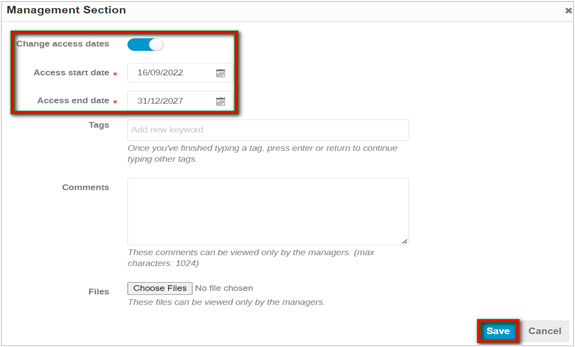
A message confirms the update. Access dates are always displayed under Accreditation details on the request summary page.

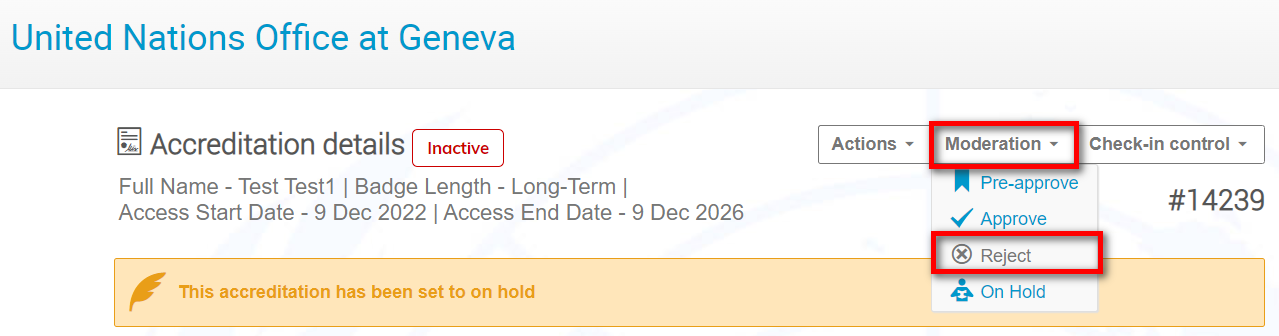
Reject a request
Rejection does not allow any further action on a request. A reason should be given for rejection.
In the request summary page click Moderation and select Reject.
A pop-up window appears on-screen requesting a reason for rejection.
Enter a reason in the field Reason or select a common reason from the Stored reasons list (refer to the page Email Templates). The default rejection e-mail includes a reason for rejection placeholder. If you enable Share reason with user the reason will be included in the e-mail notification.
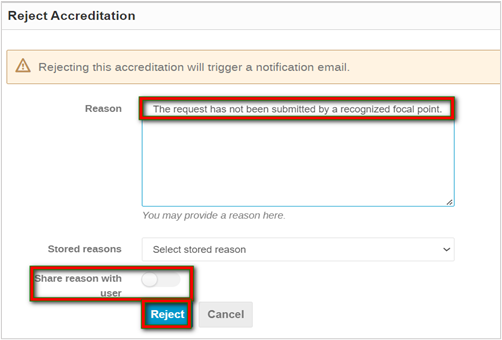
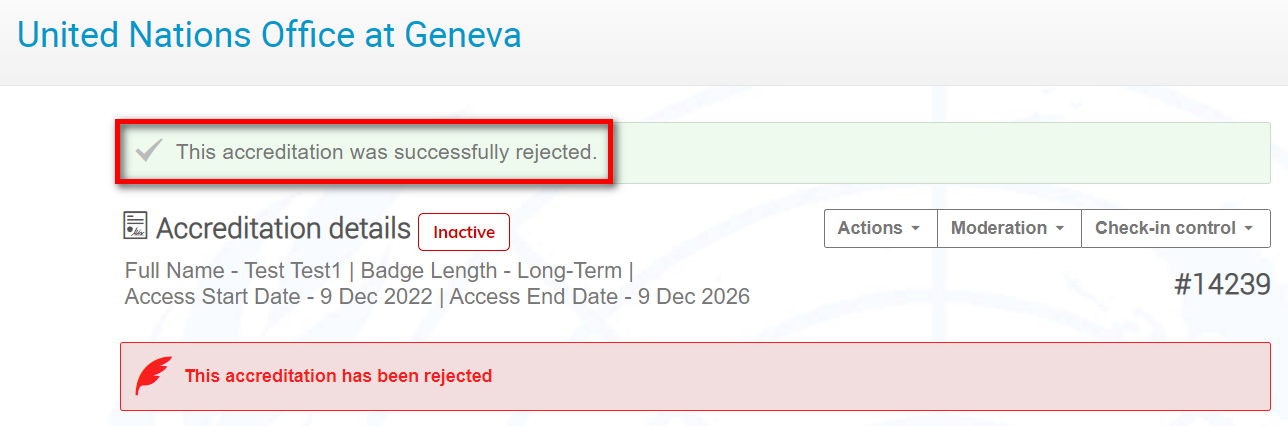
A message appears on-screen confirming the rejection[6].
Once rejected, an e-mail notification is generated and sent to the requestor and the focal point (if request was submitted by one). If a focal point group has been set up, a notification may enabled to be sent there too.
Upon rejection, a request may subsequently be:
- placed on hold (by manager/security officer)
NOTE: Rejected requests may not be sent to C*Cure for printing.
Place a request On Hold
When managers want to examine more closely a request, On Hold may be used.
An On Hold request does not allow further modifications to a request.
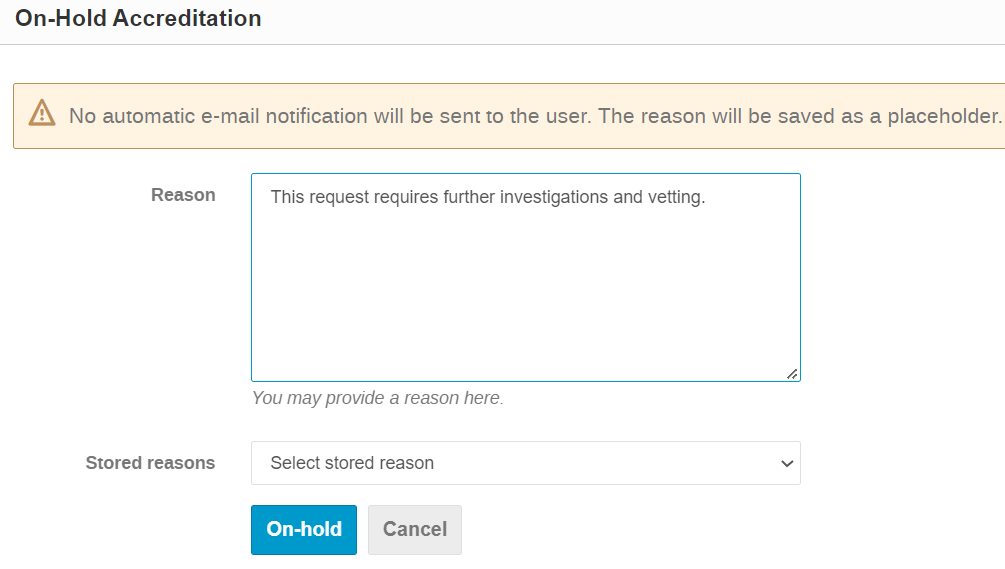
In the request summary page click Moderation and select On Hold.
A pop-up window appears on-screen requesting a reason for placing the request On Hold.
Enter a reason in the field Reason or select a stored reason (refer to the page Email Templates).
A message appears on screen confirming the on-hold status[7].
Requests On Hold do not trigger an automatic e-mail notification. An e-mail may be sent manually instead (refer to the section above Actions) and may include the on hold reason (refer to the page Email Templates).
Upon placing a request On Hold, it may subsequently be:
- approved (by manager/security officer)
- pre-approved (by manager/security officer)
- rejected (by manager/security officer)
- withdrawn (by focal point)
NOTE: On Hold requests may not be sent to C*Cure for printing.
Subcontractors/double badging
In situations where a contractor works between two enterprises, each focal point/requestor will nonetheless submit a badge request for the contractor for the duration he/she is representing/working on the enterprise’s behalf.
The contractor first name, last name and birth date in the two applications for enterprise A and B allow the system to identify the contractor and create a full history of the participant.
The complete history of requests will be visible to the Managers and Security.
However, since a focal point/requestor may view only the history of contractors working for his/her enterprise only, they are unable to verify if the contractor continues to have a valid badge with enterprise A whilst commencing work with enterprise B. Therefore, SHP managers and security officers when processing requests should take the necessary action to ensure that one badge is returned. Badge holders should only ever be in possession of one badge at a time.
[1] Only managers may perform a search. Readers may not.
[2] * = mandatory fields.
[3] * = mandatory fields.
[4] You may also create a tag from within the request summary page – scroll to the Management Section.
[5] Approved requests with a current validity are displayed as Active on the request summary page.
[6] Rejected requests are displayed as Inactive on the request summary page.
[7] On hold requests are displayed as Inactive on the request summary page.